NBI Clearance Online Appointment & Apply For Clearance Renewal 2026
NBI clearance is required for jobs, travel, visa applications, government transactions, and almost every organization asks for it at some point. Click the button given below to start your NBI Clearance registration now.
The process itself is never complicated. You register, activate your account with an OTP, fill in your details, pay, pick your branch and appointment time, and visit on the NBI appointment date to receive your clearance. That’s it! Learning from scratch, as well as what to do in case of multiple options, will boost your confidence in receiving a valid NBI clearance.
What Is an NBI Clearance?
An NBI Clearance is an official certificate from the National Bureau of Investigation. It proves you have no criminal case or bad record on file. You need it for many things: job applications here and abroad, visa processing, government transactions, adoption, legal matters, and even scholarships.
And the best part? One clearance covers all of these at the same time, as long as it is still valid within one year.
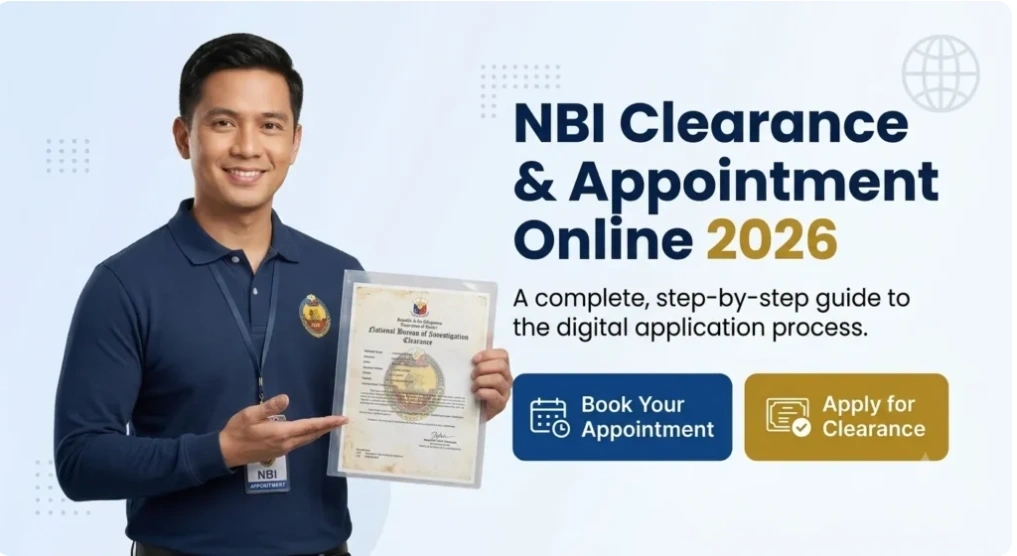
The basic difference is simple: An NBI clearance online is the official document proving you have no criminal record, while an NBI Online Appointment is the scheduled date and time to visit an NBI center and receive your clearance document.
NBI History
The National Bureau of Investigation was established in 1936 as the Division of Investigation under the Philippine Department of Justice. Over the years, it grew into the country’s leading investigative agency, handling major crimes, corruption cases, and serious criminal investigations across the Philippines.
Is NBI Clearance a Valid Government ID?
No. An NBI clearance is a certificate, not a government ID. You cannot use it where a valid government ID is required. It only serves as a supporting document alongside IDs like a passport or UMID.
Who Needs an NBI Clearance?
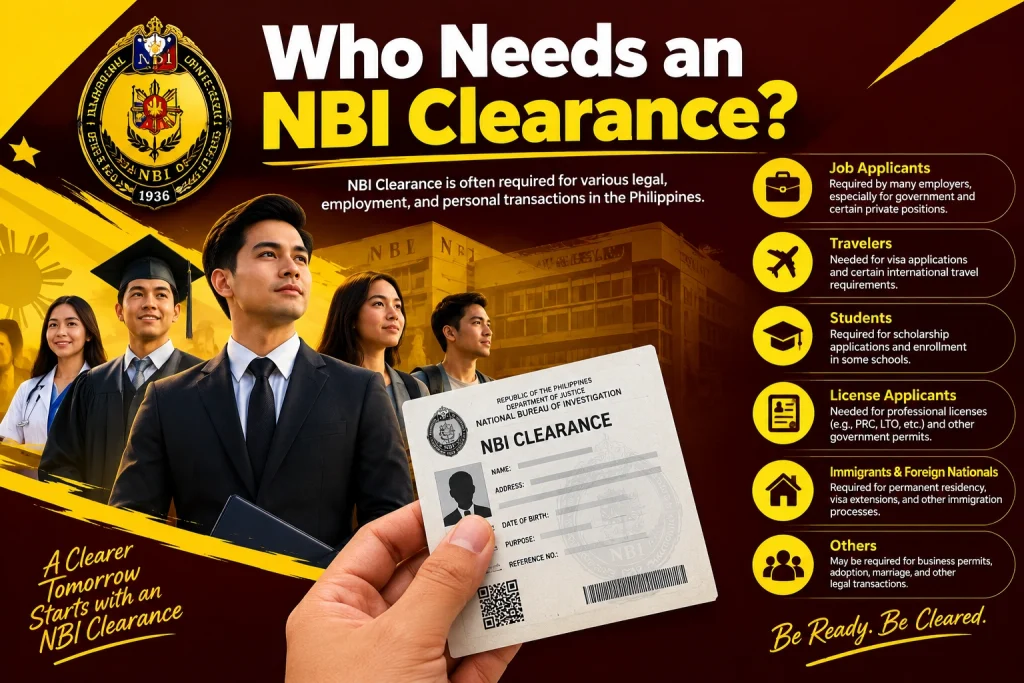
Almost everyone at some point. Whether you are applying for a local job, processing OFW documents, renewing a business permit, or applying for a visa, NBI Clearance is almost always on the list.
When it is commonly required?
One clearance covers all of these as long as it is still valid.
NBI Clearance Online Requirements 2026
Who Can Apply?
Filipino citizens 18 years old and above can apply on their own. Minors aged 15 to 17 can also apply, but a parent or guardian must come with them, along with a birth certificate and the guardian’s valid ID.
Foreign nationals legally residing in the Philippines with a valid passport and ACR I-Card (or BI acknowledgment receipt if renewing) are eligible to apply in person at the NBI Main Office in Ermita.
What IDs Do You Need to Bring?
Bring two original, unexpired IDs from this list. Not one or Two. Some guides online say one ID is enough, but the official Citizen’s Charter requires two. Do not show up with just one.
Accepted IDs:
IDs That Will NOT Be Accepted
This is where people get rejected at the counter. Know what not to bring:
How to Book Your NBI Online Appointment?
Click the button below to start your NBI appointment. Follow the step-by-step instructions below to book your appointment, prepare the required documents, understand the dress code, and know what to expect when you visit your selected NBI Office. The guide will help you get an NBI Clearance in real time.
Step 1: Go to the Official NBI Portal
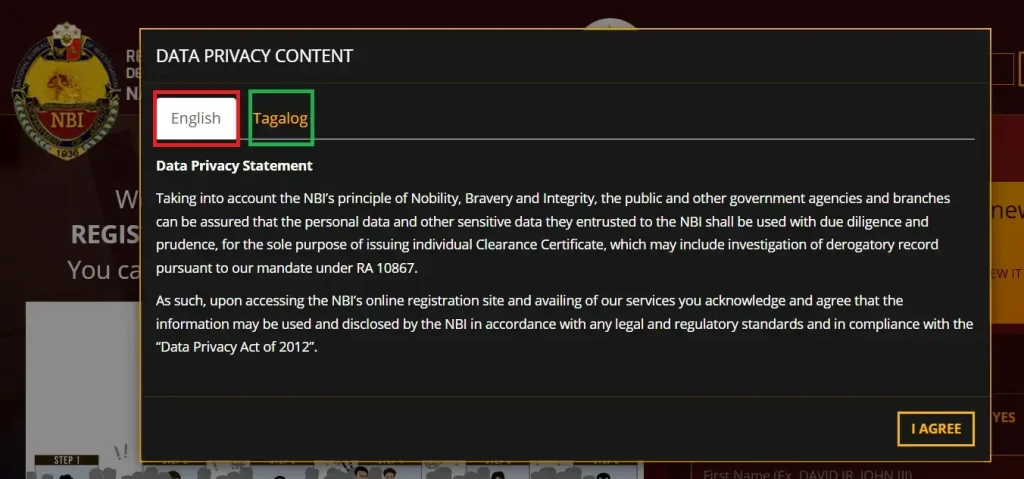
You’ll be redirected to the official NBI portal, where a privacy and terms pop-up may appear on your first visit. Simply click “I AGREE” to continue. The official NBI portal is clearance.nbi.gov.ph. Bookmark it so you can easily find it again whenever you need it.
Step 2: Choose Your Applicant Type
Usually, two options will appear. First-Time Job Seeker or Regular Applicant.
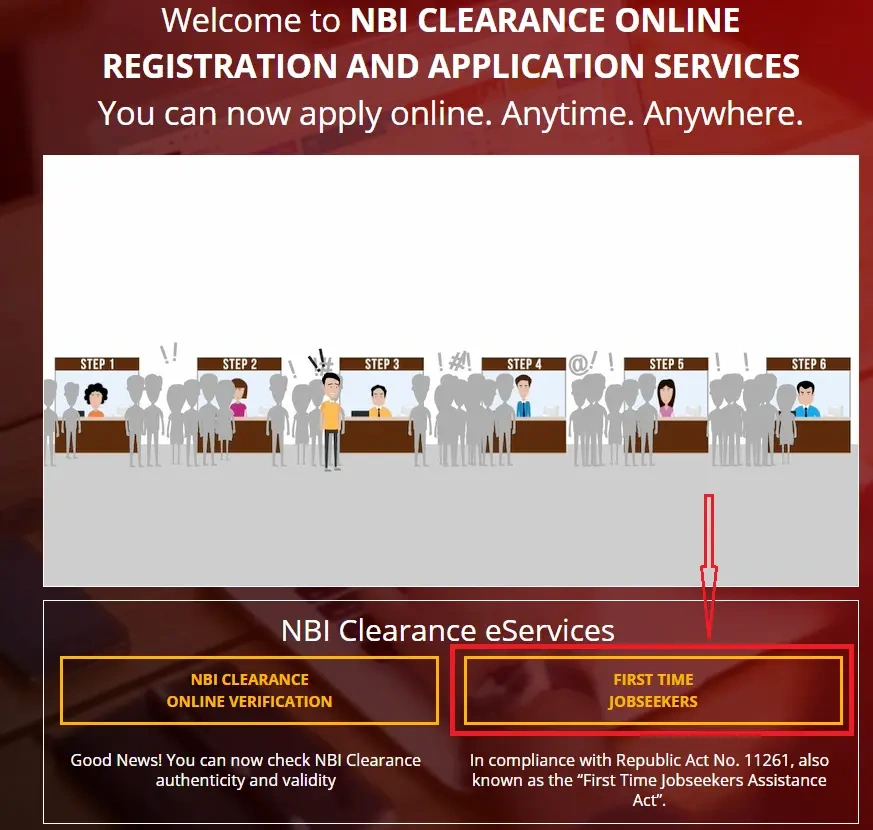
First-Time Job Seekers get routed to a separate portal at firsttimejobseekers.nbi.gov.ph. Everyone else continues on the main portal. Pick the right one before creating your account because registering on the wrong portal means starting all over again.
Categories of Applicants:
Before anything else, find out which category applies to you. The steps are different for each one, and going towards the wrong path will just waste your time.
Category | Portal | Appointment Needed? | Fee |
Regular Applicant | clearance.nbi.gov.ph | Yes | ~₱130 base (+ service fee) |
First-Time Job Seeker | Yes | Free (once in a lifetime) | |
Renewal (unchanged details) | clearance.nbi.gov.ph | No | Same as regular |
OFW / Foreign National Abroad | Philippine Embassy / Consulate | No (mailed process) | ₱200 total |
Walk-In (limited) | In person at branch | No | Same as regular |
If you are a regular applicant, pick your Method:
Method | Best IF |
Online With E-Payment (recommended) | You want the fastest process, no in-person payment queue |
Online Without E-Payment | You’d rather pay cash at the branch |
Walk-In | You want to visit the branch |
Step 3: NBI online Registration and sign up
Go to clearance.nbi.gov.ph.
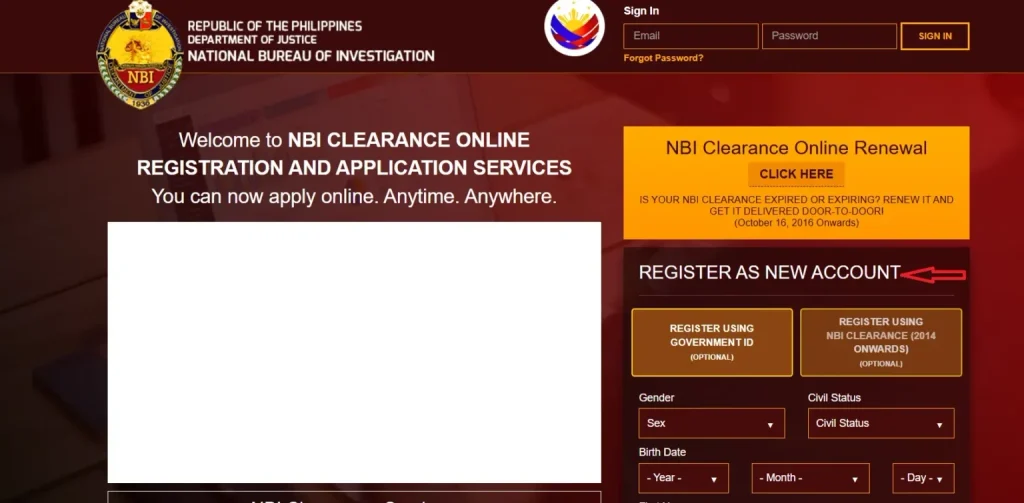
Under “Register as New Account,” choose one of the two tabs:
Fill in the form:
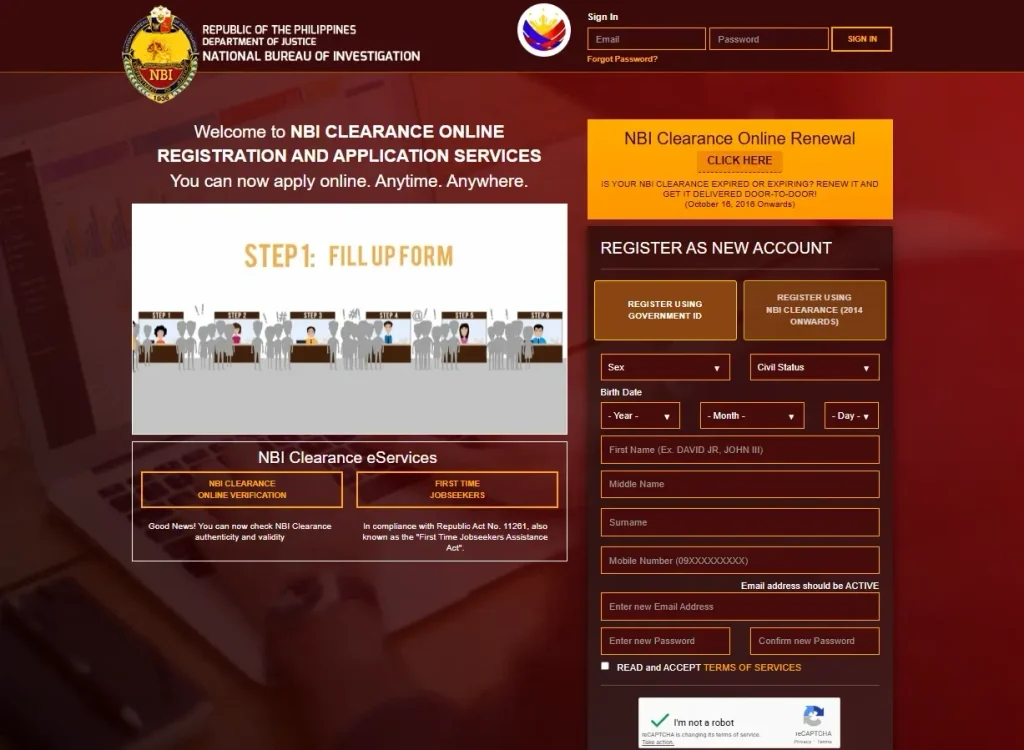
Step 4: Verify and activate Your Account
NBI will send a One-Time Password to your mobile number. Enter it exactly as received. OTPs expire within minutes, so do not delay.
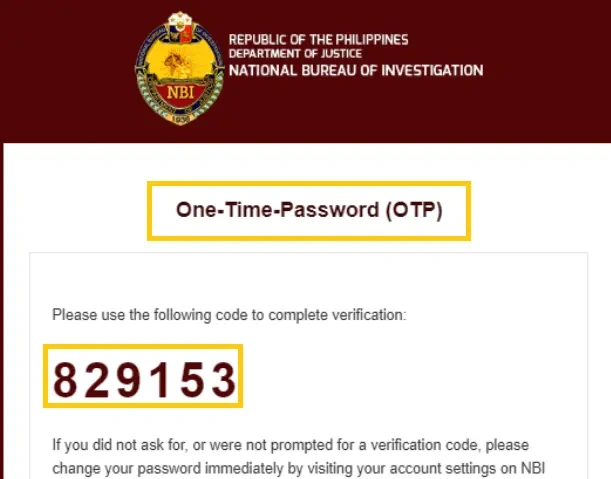
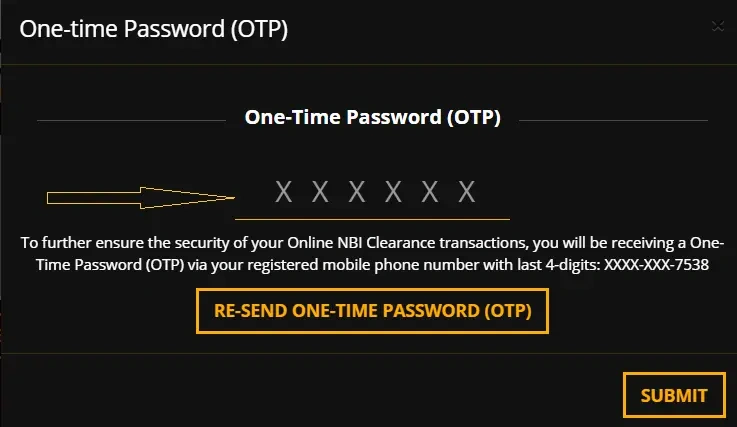
After adding the OTP, you will receive an activation link with a button labeled “Activate Account“. Click it. Now you need to log in to your account.
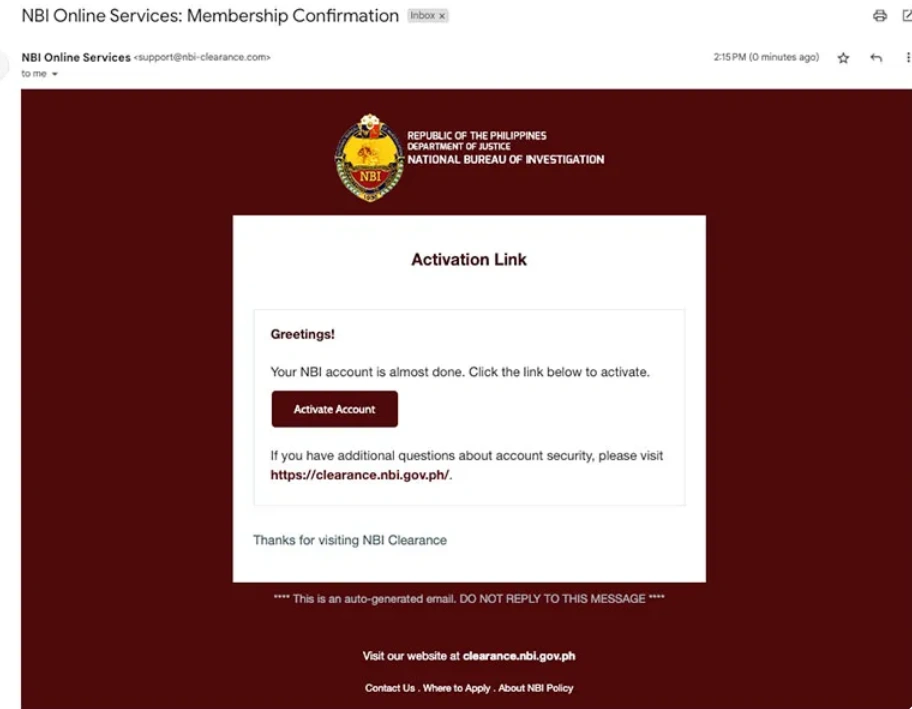
NBI Log in to your account once you have added your email and password. After this, click Sign In and move to the Applicant Information page comfortably.
Step 5 Complete Your Applicant Profile
Fill in your full legal name, birthdate, birthplace, address, and civil status, and then click Save Information.
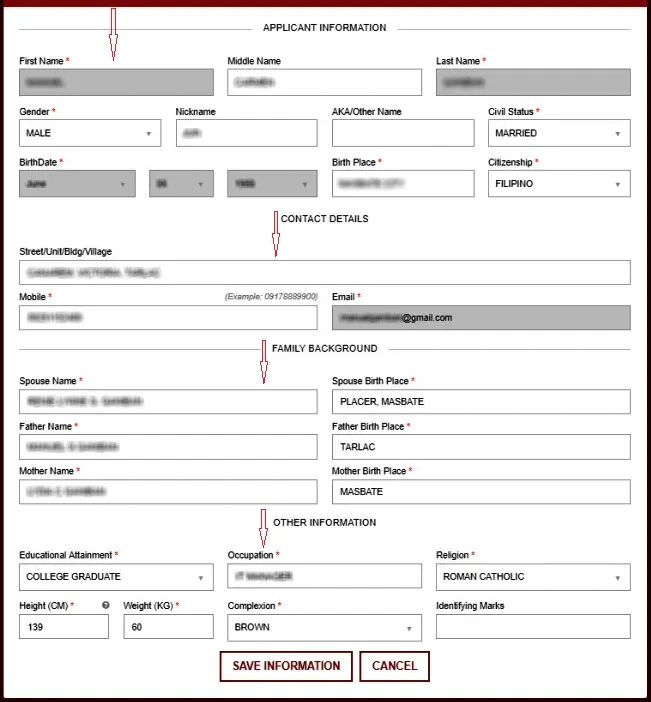
After adding the information, you will move to a summary list of your information.
Step 6 Apply for Clearance and Select Your Two IDs
After submitting the details, you will move to the next page where your profile is successfully updated. Here you will see two buttons at the top, “Apply for NBI” and “Edit Information”.
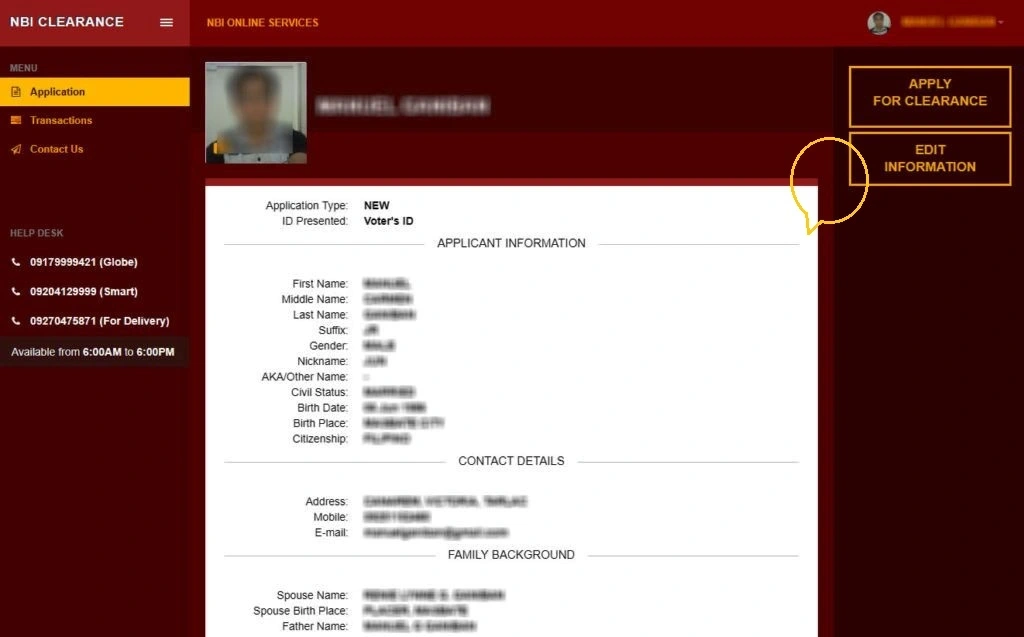
NBI EDIT Information:
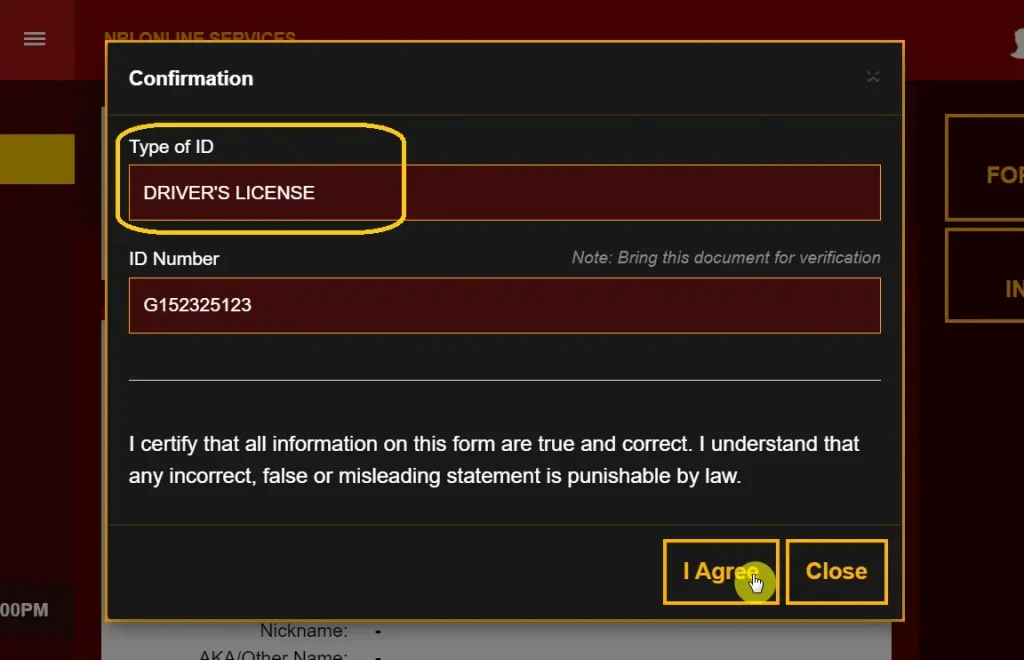
Step 7: Book Your Appointment and Pay Online
Okay, now we are on the page of selecting a branch. At the top, you will need to select the branch. The calendar below it shows dates highlighted in blue; only dates with blue are available, so choose one that fits your time well.
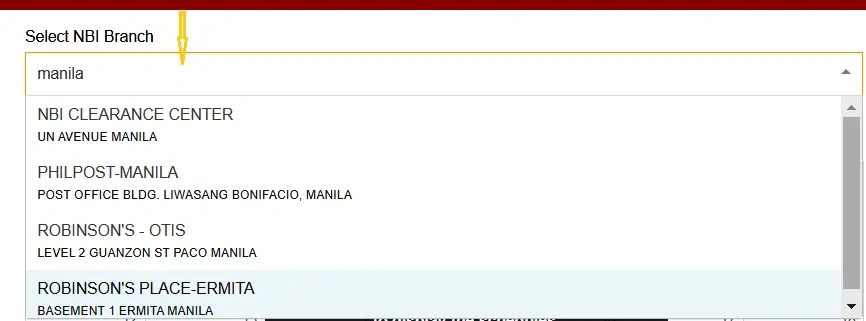
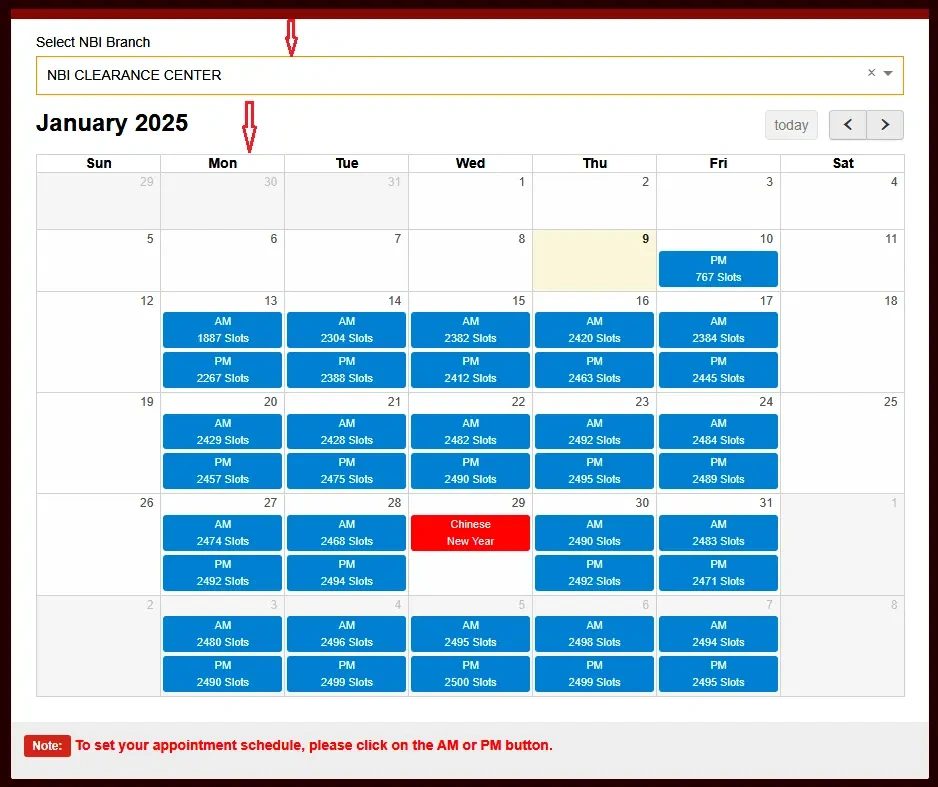
After selecting your desired date, scroll down, and you will see the Amount you have to pay and also the branch name, its address, day, date, and the exact time.
When you scroll down more, you will see the payment methods; they include:
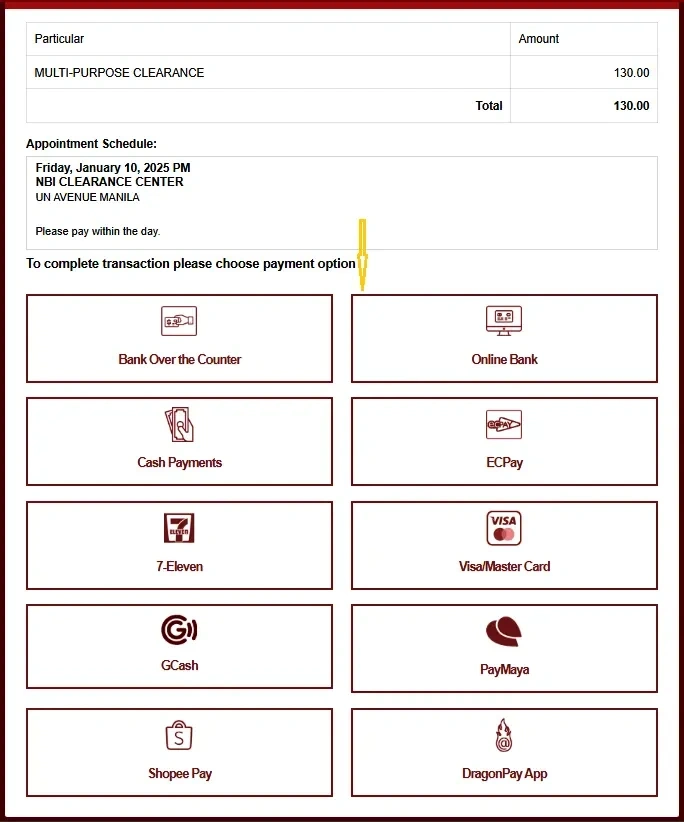
Select which suits you, and then you will see a list of Banks from where you can pay. Choose your bank account company and then click Proceed.
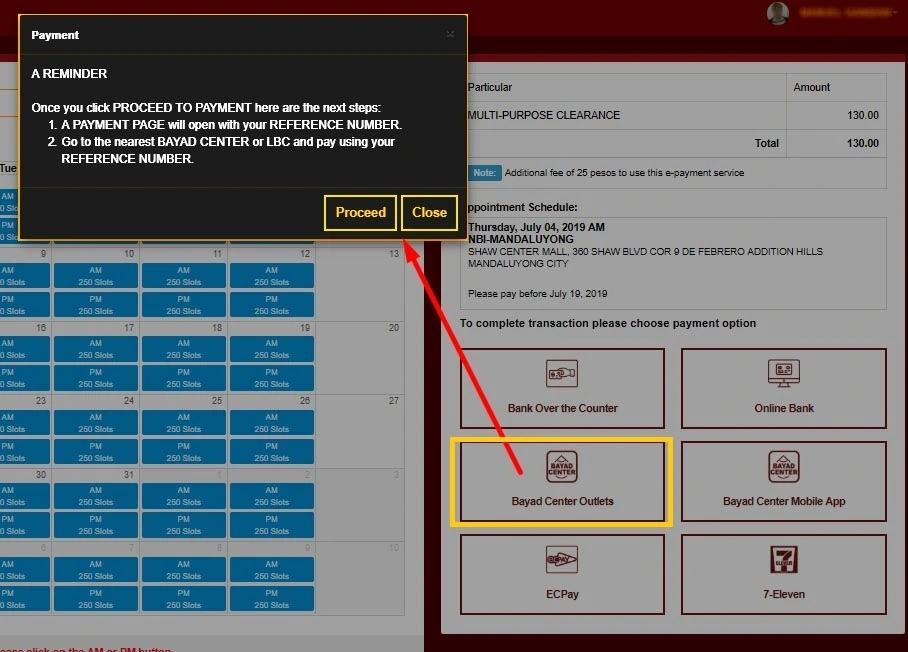
Now your NBI appointment schedule will appear again with an option to proceed to payment. Click it.
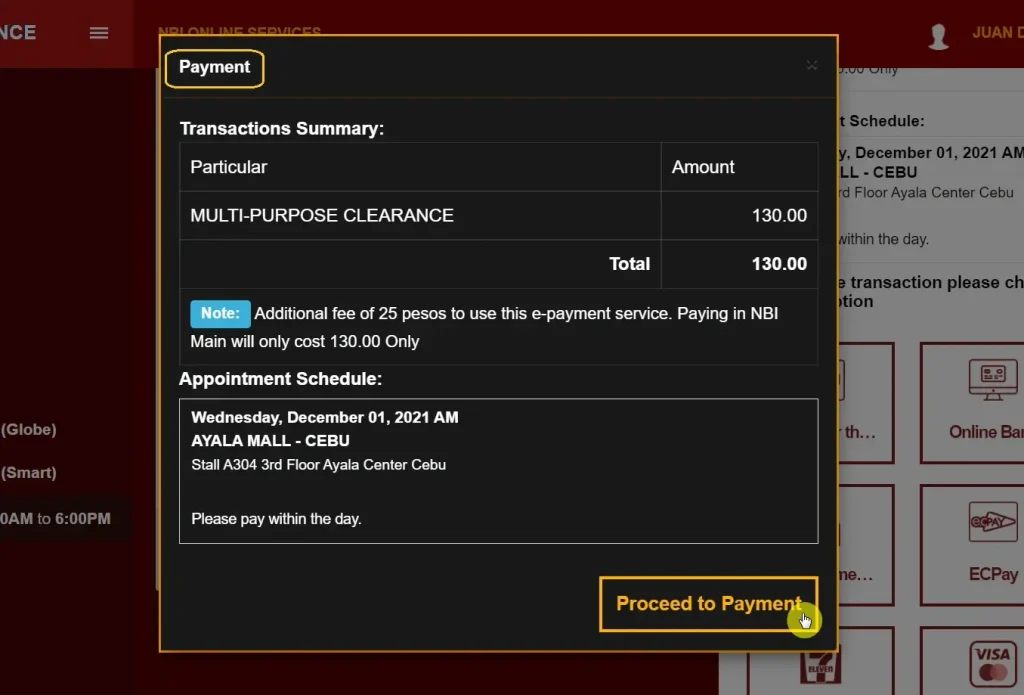
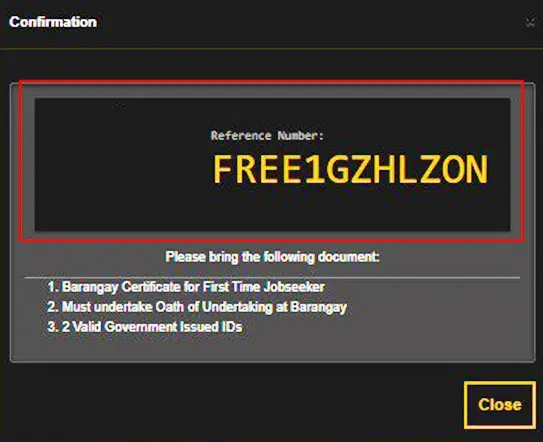
After choosing the bank channel and clicking Proceed to Payment, you will receive an NBI reference number with the clearance fee, system fee, and total fee to pay. Click the yellow close button.
Things to note:
Step 8: Visit an NBI office and get your NBI Clearance
Bring your printed or saved barcode, reference number, and two valid IDs. That is all you need to walk in.A helpful piece of advice for you is that you should arrive 15 to 30 minutes earlier, as this habit has already proved beneficial in many cases.
What to Expect at Your NBI Appointment
Follow these steps on the day of your appointment for a smooth experience.
Dress Code
Dress nicely but keep it simple and decent. Wear a collared shirt, proper pants or a knee-length skirt, and closed shoes. Some NCR branches may have stricter dress requirements, so dressing appropriately is recommended.
Entrance Check
Show your appointment barcode or reference number and one valid ID to the security guard at the entrance. Your details will be checked before you are allowed inside.
Information Desk
If it is your first time at the branch, visit the information desk. Branch layouts can vary, and staff can direct you to the appropriate counter or processing area.
Application Verification
Staff will cross-check your online application against your physical documents and identification. Make sure your personal information matches your documents.
Biometrics Capture
Your fingerprints will be scanned and recorded as part of the clearance application process. The biometric capture is generally a quick step.
Signature Capture
You will provide your digital signature using the signature pad. Follow the staff’s instructions and make sure the captured signature is correct.
Photo Capture
Your photograph is taken at the branch during processing. This photo is used for your NBI Clearance certificate.
Data Verification
Review the information displayed on screen, including your name, birthdate, and other personal details. Check everything carefully before confirming the information.
Final Verification & Release
Once the required checks are completed, your NBI Clearance can be printed and released according to the processing status of your application.
How To Receive & Print Clearance?
No HIT: Same-Day Release
Great news if your name comes back clean. You go straight to the Printing Section, and your clearance is printed right there on the spot.
The printing itself takes about 15 seconds. The wait you feel at the branch is just the queue, not the actual printing. You leave the same day with your clearance in hand.
HIT: You Will Need to Come Back
HIT does not mean you have a criminal record. It just means a name similar to yours showed up in the system.
Here is what happens next:
When you come back, bring:
Once cleared, you go straight to the Releasing Section and get your printed clearance.
Flagged “For Quality Control”
This one is different from a HIT. Instead of going to printing, you are sent to the Quality Control Section for a short interview. Staff will check your records against the NBI Criminal Database and ask a few questions about any record found. Once you are cleared, the clearance moves forward to release.
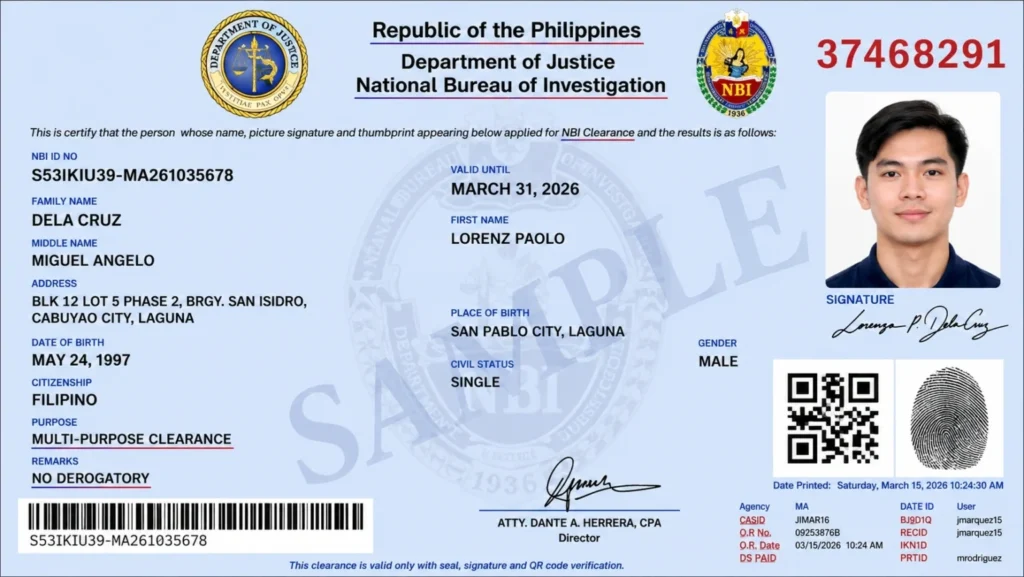
What an NBI Clearance Looks Like (Sample & QR Code)?
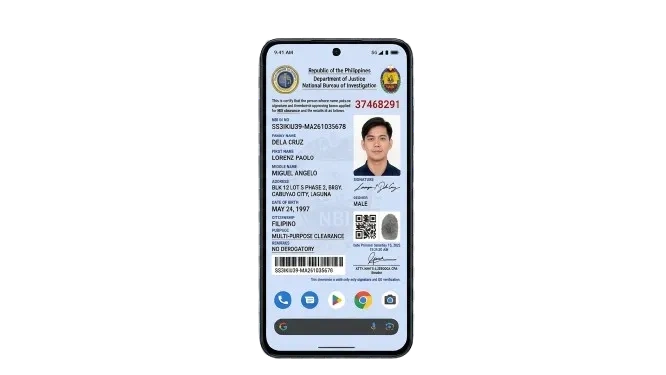
Here is exactly what you will see on your National Bureau of Investigation Clearance certificate:
NBI Apostille Appointment
An apostille is a certificate that proves your NBI Clearance is real and officially issued by a Philippine government agency. It helps another country accept your NBI Clearance as a valid document.
Why It Matters
A plain NBI Clearance may not be accepted for use in another country. In many cases, it first needs an apostille from the Department of Foreign Affairs (DFA) so the document can be officially recognized abroad.
How the Process Works
How to Check Your NBI Clearance Status?
Log in at clearance.nbi.gov.ph and go to the Transactions page in your account dashboard. A successful payment shows as “Paid.” Simple as that.
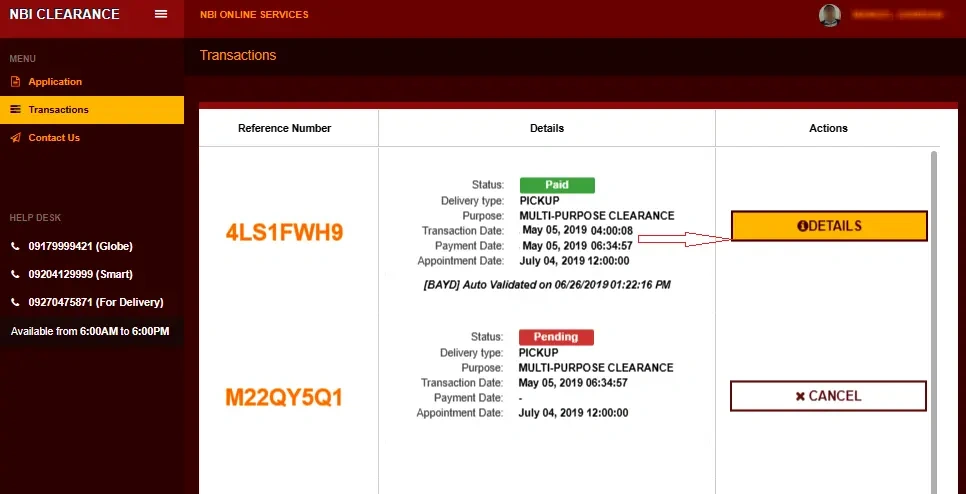
If it still shows “Pending,” do not panic just yet. Give it some time first:
Still Pending After That?
Follow these steps before assuming something went wrong:
Hit Status issues:
If you got a HIT, there is no need to worry because the branch and workers can resolve this issue, as according to rules they will ask you to visit again in 3 to 5 days, and everything will be reset.
Lost Your Barcode or Confirmation Slip?
No need to rebook or pay again. Just log in, go to Transactions, find your appointment and click Print. Your QR code and application form will regenerate instantly. Everything stays tied to your account.
NBI Clearance for First-Time Job Seekers
First time job seekers can get a free clearance certificate under the First-Time Jobseekers Assistance Act (RA 11261).
Who Can Apply?
To qualify, you must have never worked before, never claimed this free benefit, and remember that it can only be used once.
How to Apply?
How to Apply for NBI Online Appointment at the Branch?
Walk-ins for regular applicants are generally not allowed. You need to book online first. However, if you qualify for a priority lane (emergency, or you are a senior officer and need this, and pregnant women are also considered ) or you are within the 15-day grace period after a missed paid appointment, here is how the in-person process works:
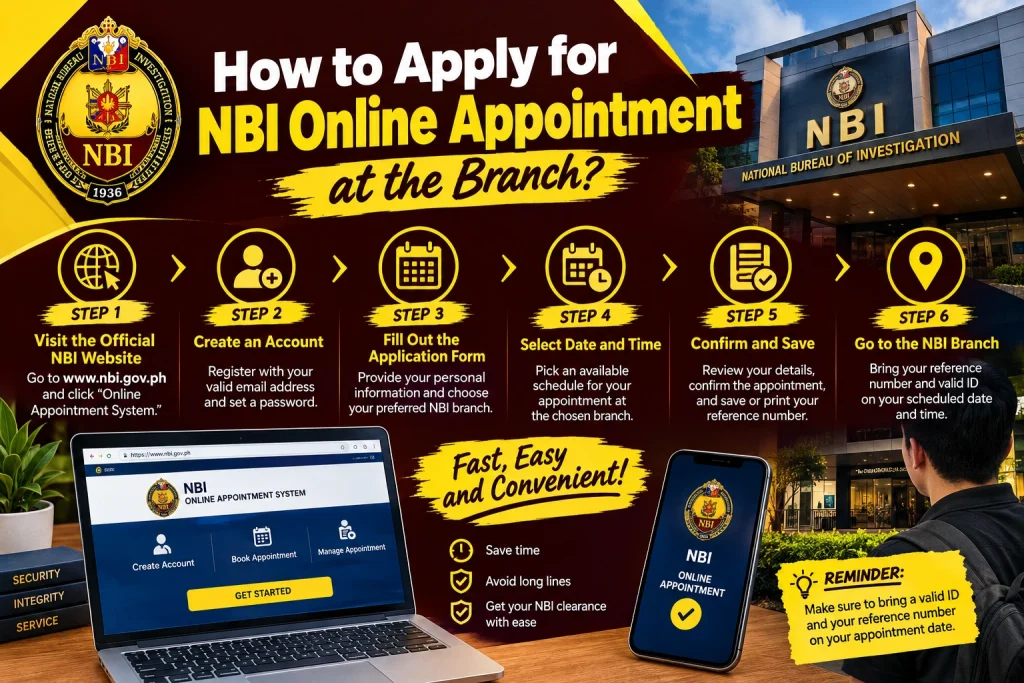
Who Can Walk In Without Booking Online?
Not everyone needs to book ahead. These people can walk in directly:
Major NBI Appointment Branches and Locations
NBI operates 103 branches nationwide. Below are the most frequently used ones, verified against NBI’s official Office Locator.
Branch | Location | Hours |
NBI Main Office (UN Avenue) | U.N. Avenue, Ermita, Manila | 7:00 AM to 5:00 PM |
Quezon City Hall | Makatarungan St., Diliman, Quezon City | 7:00 AM to 5:00 PM |
Robinson’s Galleria | Basement 1, Ortigas Ave., Quezon City |
|
Cebu (CEVRO) | Escario St., Capitol Site, Cebu City | 6:00 AM to 5:00 PM |
Davao (SEMRO) | J.P. Laurel Avenue, Davao City | 8:00 AM to 5:00 PM |
Iloilo (WEVRO) | Duran St., Fort San Pedro, Iloilo City | 8:00 AM to 5:00 PM |
For any branch not listed here, visit NBI’s official Office Locator at nbi.gov.ph/clearance-office-locator/.
NBI Clearance Infographics
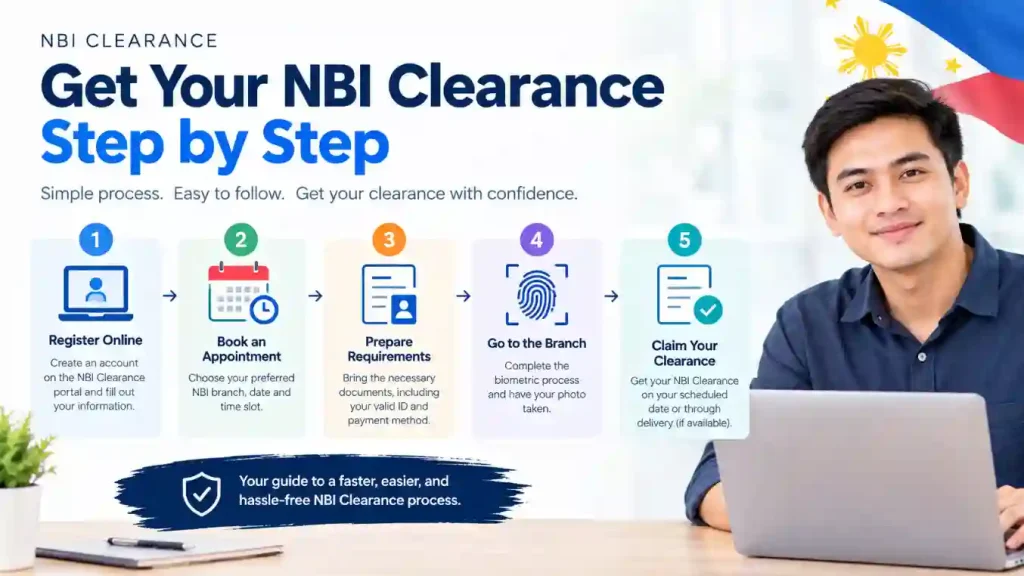
NBI Online Registration & Appointment Video Guide
All Payment Methods with NBI Fees
NBI online appointment and clearance prices and the authorized channels from where you can pay are given below .
Category | Channel | Fee / Notes |
Digital Wallet | GCash | +P30 service fee = ~P160 total (highest of any channel) |
Digital Wallet | Maya | +P25 service fee = ~P155 total |
Digital Wallet | ShopeePay | Available for renewal transactions |
Retail / OTC | 7-Eleven (CLiQQ kiosk) | Cash; up to 24 hours to reflect |
Retail / OTC | Bayad Center | Thousands of outlets nationwide |
Retail / OTC | ECPay (RD Pawnshop, TrueMoney) | Cash; similar delay to 7-Eleven |
Retail / OTC | Palawan Express, Cebuana Lhuillier | Additional cash options |
Retail / OTC | Robinsons Business Center | Over-the-counter |
Banking | BDO, BPI, Metrobank, LandBank, UnionBank | InstaPay / PESONet / over-the-counter |
Banking | LandBank LinkBiz | Government payment portal |
Card | Visa / Mastercard | Paid directly through the portal |
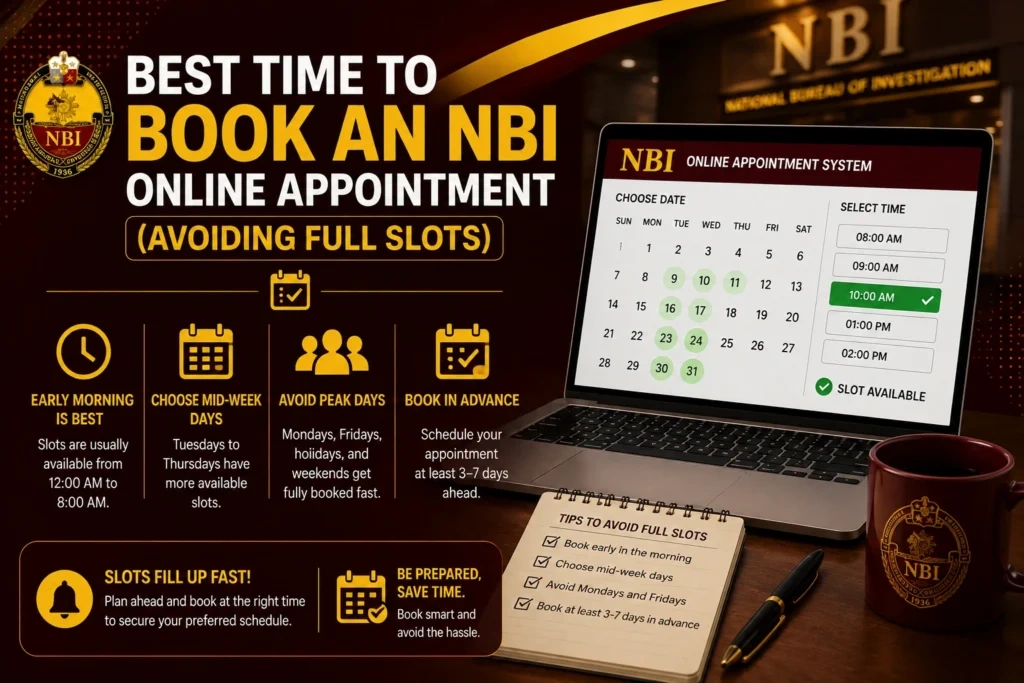
Best Time to Book an NBI Online Appointment (Avoiding Full Slots)
Best Months to Apply For NBI Appointment Online?
Period | Demand | What to Expect |
January | Peak | Slots fill fast. Book early. |
June to July | Peak | Graduation and OFW season. Expect crowds. |
March to May | Off-Peak | Lighter volume. Good time to apply. |
September to November | Off-Peak | Best months overall. Short queues. |
December | Moderate | Apply early in the month. |
NBI Clearance Cebu Online Appointment 2026
Getting an clearance in Cebu follows the same process as the rest of the Philippines. Book your appointment through clearance.nbi.gov.ph, choose Region VII (Central Visayas), and select your preferred Cebu branch.
You can choose from locations like the NBI Cebu Regional Office in Capitol Site, J Centre Mall, Robinsons Cebu, and other authorized branches.
- Bring your valid ID and payment receipt on your appointment day.
- For NO HIT cases, your clearance is usually released the same day.
NBI Clearance Renewal
Online renewal is fast and easy, but not everyone qualifies. Check if all of these apply to you:
If all three are true, you are good to go online.
When You Cannot Renew Online?
Some situations mean you have to start fresh as a new applicant:
Changed your name after marriage? Bring your PSA Marriage Certificate or any legal proof of the name change and be ready for fresh biometrics. No shortcuts here.
How to Renew Online Step by Step?
It is simpler than it sounds. Here is exactly what to do:
Fees ( Pickup vs. Delivery)
Option | Total Fee | Timeline |
Branch Pickup | ~₱155 (₱160 via GCash) | Same day, if no HIT |
Door-to-Door Delivery ( Metro Manila) | ~₱355 total (₱155 + ~₱200 courier) | 3-7 working days |
Door-to-Door Delivery ( Outside Metro Manila) | ~₱505+ total (varies by distance) | 7-10 working days |
Pick up or delivery ( decide this before you pay because you cannot change it after):
Pickup is the better choice if you are in Metro Manila and expect no HIT. You get your clearance the same day right at the branch. Delivery takes three to seven days longer and costs around ₱200 extra on top of everything else.
Only go for delivery if you genuinely cannot visit a branch or you live far outside Metro Manila. And if you paid for pickup but cannot go yourself, just send someone you trust. They need to bring a valid ID and a signed authorization letter from you.
What Happens If You Need to Correct Details During Renewal?
How to Reschedule or Recover a Missed NBI Appointment?
Most guides get this wrong. NBI does not have a reschedule feature after payment. There is no edit button, no change date option, and no reschedule function in your account once payment clears. Your branch, date, and time are locked the moment you pay.
What NBI offers instead is a 15-day grace period.
Everything is still flexible. Change your branch, date, or time as many times as needed. Nothing is locked yet.
This is exactly how it works:

Before payment
Everything is still flexible. Change your branch, date, or time as many times as needed. Nothing is locked yet.

After payment
The slot is fixed. Miss the appointment, and there are 15 calendar days from the original date to walk into the same branch that was booked. Bring the reference number, payment receipt, and two valid IDs.

After 15 days
The slot and payment are both gone. A brand new application with a fresh payment is the only option left.

KEEP IT IN MIND :
Treating this as rescheduling makes it easy to assume the branch can be switched, the date pushed back, or the grace period used more than once. None of that is possible. Think of it as a strict 15-day deadline, and the ₱155 will never be lost over a simple misunderstanding.
Special Situations for NBI Online Appointment
Mailed NBI Clearance for Filipinos Abroad and OFWs)
If you live or work outside the Philippines, you do not have to fly back just to get your clearance. This guide explains the official process for applying for an NBI Clearance for Abroad while living overseas.
This is commonly required for OEC renewal, new foreign employment, visa renewal, or any transaction that requires proof of a clean criminal record while you are overseas.
How to Apply From Abroad?
If you Already Have an Old Clearance
If your previous clearance was issued in 2014 or later and none of your personal details have changed, you can renew it without going through Form No. 5 or submitting new fingerprints. Much simpler and faster.
Using an SPA (Authorized Representative)
It simply means allowing someone in the Philippines to submit your documents and claim your clearance on your behalf while you are abroad.
When to Use
Steps to follow
Foreign Nationals Residing in the Philippines
The standard process for non-Filipinos legally living, working, or doing business in the Philippines who need clearance.
When you need it :
Renewing a work visa (9G, 47A2), permanent residency via marriage (13A visa), business registration (DTI/SEC/BOI/PEZA), or when requested by the Bureau of Immigration.
Clear steps to get it :
NBI Clearance vs. Police Clearance: What’s the Difference?
Feature | NBI Clearance | Police Clearance |
Issued By | National Bureau of Investigation (NBI) | Philippine National Police (PNP) |
Coverage | Nationwide criminal record check | Local records within a city or municipality |
Checks | Criminal cases and judicial records nationwide | Local police records, complaints, and arrests |
When you need it | Overseas employment, visas, passports, immigration, government transactions, and major employment | Local employment, business permits, and community requirements |
1 year | 6 months | |
Typical Fee | Around ₱130–₱160 | Around ₱100–₱200 |
Processing | Online registration, appointment, and branch visit for biometrics | Usually processed at the local police station, often on the same day |
Accepted for Overseas Use | Yes | No |
Online Renewal | Yes, if eligible | No |
Pros And Cons of NBI Appointment
Pros
Cons
Common NBI Online Appointment Problems and How to Fix Them?
Even when you follow every step correctly, things can still go wrong. The good news is most of these problems are easy to fix.
NBI SERVICES
There are a lot of websites out there that look like NBI but are not. The simple rule to remember is NBI only operates through .gov.ph domains. If the website address does not end in .gov.ph it is not NBI, no matter how official it looks.
Official NBI Platforms
What Do These Platforms Offer?
We Are Here TO Help About NBI Online Appointment & Clearance
Customer Support is ready to serve you for quick process.
Postal Address
National Bureau of Investigation Filinvest Cyberzone Bay City, Bldg. C Diosdado Macapagal Blvd, Pasay City, Metro Manila
Frequently Asked Questions
CONCLUSIONS
Getting your NBI Clearance is straightforward once you know the right path. Most delays happen because of small, avoidable mistakes, wrong ID, a typo in your name, missing an appointment, or trusting a fake website that looks like the real one.
Before going, keep these things in mind:
JUAN DELA (NBI-Clearances.ph)
I’m Juan Dela, and I have more than five years of experience researching and working with information related to NBI Clearance applications and procedures in the Philippines.
Over the years, I’ve learned about the common questions and difficulties applicants face, from online registration and appointment scheduling to requirements, renewals, and claiming clearance. Visit About Us Page for more information.